This page describes the "Send card details" action for our Primer Vault app. This app is only available on demand. Speak to your Customer Success Manager or raise a ticket on our JIRA Service Desk. If you don't have access, please contact your account administrator for assistance.
Primer Vault app
Use this app to pass card details to a PCI compliant endpoint using the "Send card details" action. To do so you have to pass in a Primer token, configure the endpoint, and provide a payload with specific placeholders.
Setting up the action
The "Send card details" action currently supports the following inputs:
| Input | Type | Description |
|---|---|---|
| Primer token | string | The multi use token ID for a user referring to a specific credit card. |
| Target domain | select | A list of enabled PCI compliant third-parties. This list is empty by default and needs to be enabled for each account manually, pending a PCI review. |
| Target path | string | The path within the third-party endpoint to post card details to. |
| Payload | string | Map a field to pass the payload through. Make sure to use the placeholder variables as needed. |
| Content Type | string | Set the content type of the payload, like application/json or application/xml |
| Placeholder variables | - | A set of available token fields that the action will replace with actual values from the token. |
| Cardholder name | string | The placeholder for the cardholder name, by default {{CARDHOLDER_NAME}} but can be changed according to the individual needs. |
| Card number | string | The placeholder for the cardholder name, by default {{CARD_NUMBER}} but can be changed according to the individual needs. Important: Sending a payload that does not at least contain the placeholder for card number will fail the action immediately without attempting a third-party request. |
| Expiry month | string | The placeholder for the card expiration month, by default {{EXPIRATION_MONTH}} but can be changed according to the individual needs. |
| Expiry year | string | The placeholder for the card expiration year, by default {{EXPIRATION_YEAR}} but can be changed according to the individual needs. |
| Expiry year format | yyyy or yy | Different endpoints handle the expiration year differently, so you can choose which format to send. |
| Custom headers | list | You can set additional headers to be sent if necessary. You must not use this for API keys or other authorization methods, as the credentials will be visible in the Workflow Run view. Instead, set credentials and authorization header name when configuring the App itself. |
| Request ID | string | You can specify a request ID that will be returned as an output by this action. This can be useful if you want to forward the response to a different endpoint because you can then use the request ID to easier reconcile the requests. |
| Fail action on unsuccessful request? | checkbox | By default, this is on and the Workflow Run will fail if we do not get a 2xx response from the PCI compliant endpoint. You can disable this and create branching logic based on response status to build a comprehensive workflow handling different responses. Do note that timeouts will always lead the request to fail as you can't assume the request was received or not received. |
This action can only work with MULTI_USE tokens, as a SINGLE_USE token would be marked as consumed after the first authorize or forward attempt.
Card expiry
Because third-parties handle expiration dates differently, you can send in a custom string with month & year and primer will update the values appropriately based on the format selected.
An example to send in card expiry could be:
1"expiry": "{{EXPIRATION_MONTH}}/{{EXPIRATION_YEAR}}",CVV data
Keep in mind that the card CVV is only stored for a maximum of 15 minutes. If you need the CVV to be forwarded to a PCI compliant endpoint, you need to create a workflow that is triggered within that time period.
Action outputs
On success, the action will return the following fields as outputs:
| Output | Type | Description |
|---|---|---|
| Request ID | string | You can specify a request ID as input that will be returned as an output by this action. This can be useful if you want to forward the response to a different endpoint because you can then use the request ID to easier reconcile the requests. |
| Response body | string | The response we received from the PCI compliant endpoint. You could forward this response back to your own endpoint using the send web request action. |
| Response content-type | string | The content-type for the response from the PCI compliant endpoint. Usually application/json or application/xml. |
| Response status | string | The response status from the PCI compliant endpoint. This is useful if you set the action to not fail the workflow in case the request could not be sent. Do note that timeouts will always lead the request to fail as you can't assume the request was received or not received. |
Use cases
There are different reasons as to why card details from a token need to be shared, such as within the travel industry. To forward card details like card number, cardholder name, and expiry date to a PCI compliant endpoint, you have multiple options within workflows:
Custom flow via web request trigger
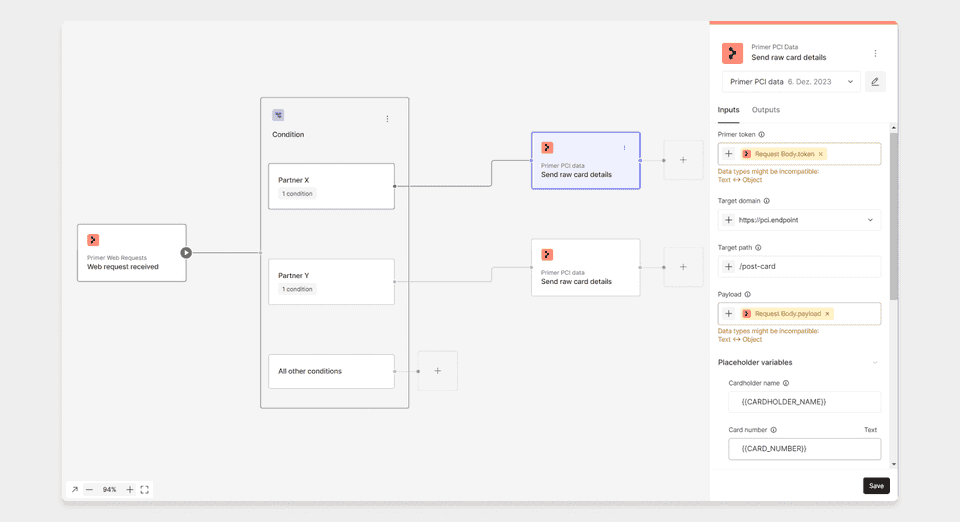
The web request received trigger allows you to send in a custom JSON payload to manually start a workflow based on your own logic.
We recommend sending in a payload like this:
123456789101112131415
{ "requestID": "YOUR_REQUEST_ID", "token": "PRIMER_TOKEN_TO_SHARE", "useCase": "SHARE_PARTNER_1", "payload": { "orderId": "1234", "customerId": "5678" "cardDetails": { "number": "{{CARD_NUMBER}}", "cardholder": "{{CARDHOLDER_NAME}}", "expiry": "{{EXPIRATION_MONTH}}/{{EXPIRATION_YEAR}}", "securityCode": "{{CVV}}" } }}
When setting up the action later, these placeholders can be configured, as well as the field for the payload. It is also possible to branch a workflow. If you have different third-parties to share data with, you could use the useCase field to branch to send different payloads to different partners.

As part of a payment flow
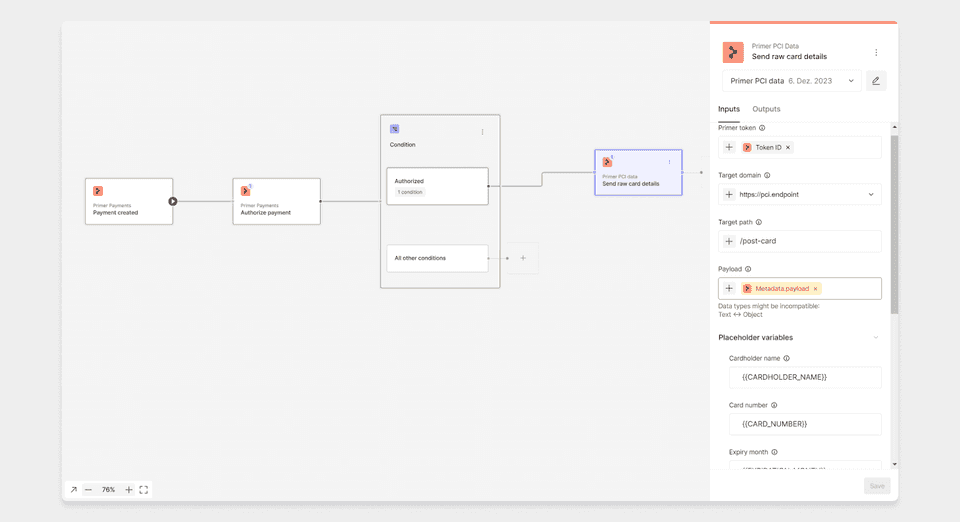
If you know that the card details need to be shared as part of a payment journey, you could also set up a dedicated workflow, by using either the payment status updated trigger or the authorize action. If you create a condition on the status Authorized, then you could add the "send card details" action of the Primer Vault app. Note that you would need to share the required payload within the metadata of the payment request.

Monitoring requests
Workflow Runs are automatically available for any workflow that was executed. For the "send card details" action the requests/responses will show placeholders instead of the actual card details sent to the endpoint.